WordPress widget is use to add advertisements, banners, newsletter sign up forms, and other elements to your website. in this blog we will create simple WordPress widget with three form field name ,email, phone and submit form, send email and show success message. let’s get started!.
- What is WordPress widgets
- How to add a widget
- Creating a Simple WordPress Widget
- Registering WordPress Widget
- Adding _construct() – Creating widget
- Adding form() – Add backend option in widget
- Adding update() – Update widget backend option value
- Adding widget() – Front-End design
- Full widget code
- Adding the Code to functions.php file
What is WordPress widgets
According wordpress.org documentation. The widget area is a pre-defined area by the theme, typically located in the sidebar or footer, but varies from theme to theme.
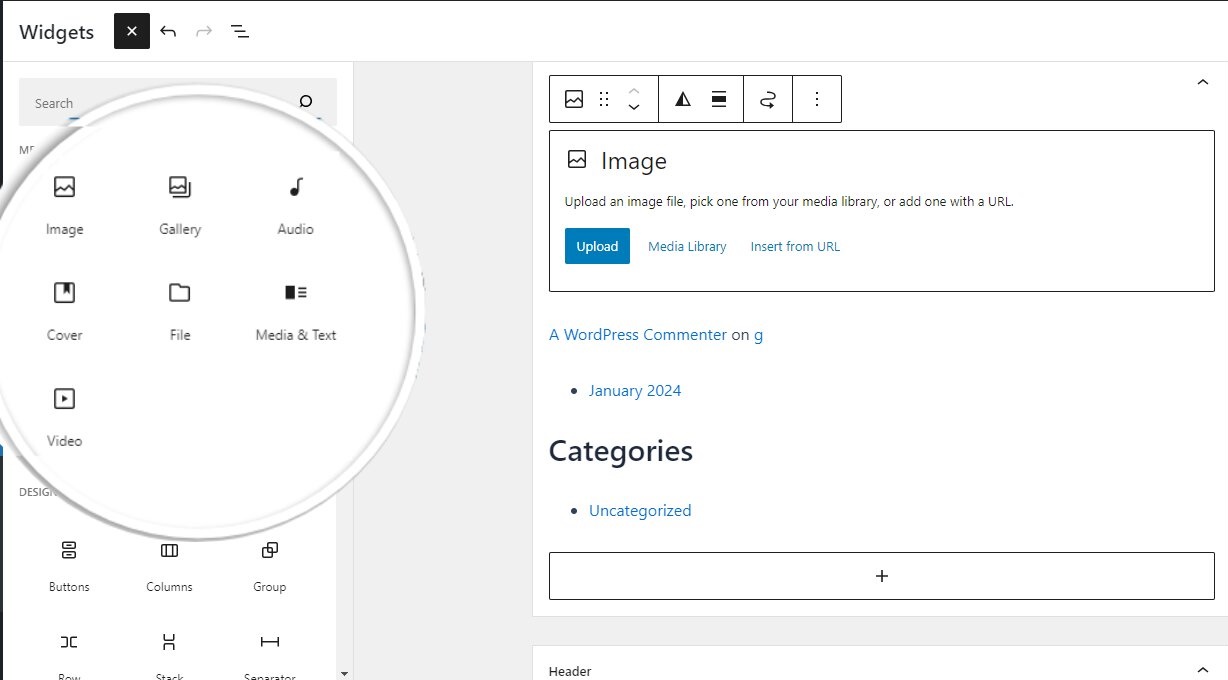
How to add a widget
1. Navigate to Appearance > Widgets.
2. Click on a specific Widget Area you’d like to edit.
3. Select the + prompt to add a widget. You can use the search functionality to find the widget you want or select Browse All to see the various options.
Creating a Simple WordPress Widget
WordPress have built-in WordPress Widget class. Every time new WordPress widget created. it extends the WordPress widget class.
wordpress.org site mention eighteen(18) methods with WP Widget class.
in this blog we will use below selected methods.
1. __construct() – This is part where you set up your widget with a description, name, and display width in your admin..
2. widget – Process the widget options and display the HTML on your page.
3. form – Display the form that will be used to set the options for your widget. If your widget doesn’t have any options, you can skip this function.
4. update – Save the widget options to the database. If your widget doesn’t have any options, you can skip this function .
Below is code where we have used above mention four methods inside the WP_Widget class.
/*Creating the widget*/
class webdav_widget extends WP_Widget {

/*The construct part*/
function __construct() {

}

/*Creating widget front-end*/
public function widget( $args, $instance ) {

}

/*Creating widget Backend*/
public function form( $instance ) {

}

/* Updating widget replacing old instances with new*/
public function update( $new_instance, $old_instance ) {

}

/*Class webdav_widget ends here*/
}
Registering WordPress Widget
The register_widget() function is used to register a widget.
Call this function using the widgets_init hook:
// Register and load the widget
function webdav_load_widget()
{
  register_widget('webdav_widget');
}
add_action('widgets_init', 'webdav_load_widget');
Adding __construct() – Creating widget
__construct() method will determine the custom widget’s ID, name, and description.
function __construct()
  {
    parent::__construct(

      // Base ID of  widget
      'webdav_widget',

      // Widget name will appear in UI
      __('WebDav Widget', 'webdav_widget_domain'),

      // Widget description
      array('description' => __('Sample widget to create form', 'webdav_widget_domain'),)
    );
  }
Adding form() – Add backend option in widget
We will create back-end of the widget using the form().
  // Widget Backend
  public function form($instance)
  {

   /*get title TextBox value */
   if (isset($instance['title'])) {
      $title = $instance['title'];
    } else {
      $title = __('New title', 'webdav_widget_domain');
    }
   /*get title TextBox value */

    /*get Show Name Form Field CheckBox value */
    if (isset($instance['fullName'])) {
      $fullName = $instance['fullName'];
    }
    /*get Show Name Form Field CheckBox value */

     /*get Show Email Form Field CheckBox value */
    if (isset($instance['email'])) {
      $email = $instance['email'];
    }
    /*get Show Email Form Field CheckBox value*/


    /*get Show Phone  Form Field CheckBox value*/
    if (isset($instance['phone'])) {
      $phone = $instance['phone'];
    }
   /*get Show Phone Form Form Field CheckBox value*/


    // Widget admin form
    ?>
    <p>

       /*Widget top title*/
      <label for="<?php echo $this->get_field_id('title'); ?>"><?php _e('Widget Title:'); ?></label>
      <input class="widefat" id="<?php echo $this->get_field_id('title'); ?>" name="<?php echo $this->get_field_name('title'); ?>" type="text" value="<?php echo esc_attr($title); ?>" />
      /*Widget top title*/

       /*Show Name Form Field checkbox*/
      <label for="<?php echo $this->get_field_id('fullName'); ?>"><?php _e('Show Name Form Field:'); ?></label>
      <input type="checkbox" class="widefat" id="<?php echo $this->get_field_id('fullName'); ?>" name="<?php echo $this->get_field_name('fullName'); ?>" value="check" <?php echo ($fullName == 'check') ? "checked" : ""; ?> />
      <br>
       /*Show Name Form Field checkbox*/

        /*Show Email Form Field checkbox*/
      <label for="<?php echo $this->get_field_id('email'); ?>"><?php _e('Show Email Form Field:'); ?></label>
      <input type="checkbox" class="widefat" id="<?php echo $this->get_field_id('email'); ?>" name="<?php echo $this->get_field_name('email'); ?>" value="check" <?php echo ($email == 'check') ? "checked" : ""; ?> />
      <br>
     /*Show Email Form Field checkbox*/

     /*Show Phone Form Field checkbox*/
      <label for="<?php echo $this->get_field_id('phone'); ?>"><?php _e('Show Phone Form Field:'); ?></label>
      <input type="checkbox" class="widefat" id="<?php echo $this->get_field_id('phone'); ?>" name="<?php echo $this->get_field_name('phone'); ?>" value="check" <?php echo ($phone == 'check') ? "checked" : ""; ?> />
 /*Show Phone Form Field checkbox*/
    </p>


<?php
  }
1. webdav_widget_domain – This webdav_widget_domain and “__e” tells “gettext” to make a string available for translation. WordPress uses “gettext” to handle translation and localization.
2. $args[] – The $args parameter provides the HTML you can use to display the widget title class and widget content class. The values contained in $args are set by the active theme when the sidebar region is registered.
3. $instance[] – this variable loads values associated with the current instance of the widget. If you added a widget to the sidebar twice, each $instance would hold the values specific to each instance of the widget.
4. widget_title filter – returns the title of the current widget instance.
Adding update() – Update widget backend option value
We have to implement update(), which will refresh the widget every time we change the settings.
 // Updating widget replacing old instances with new
  public function update($new_instance, $old_instance)
  {
    $instance = array();
    $instance['title'] = (!empty($new_instance['title'])) ? strip_tags($new_instance['title']) : '';
    $instance['fullName'] = (!empty($new_instance['fullName'])) ? strip_tags($new_instance['fullName']) : 'unchecked';
    $instance['email'] = (!empty($new_instance['email'])) ? strip_tags($new_instance['email']) : 'unchecked';
    $instance['phone'] = (!empty($new_instance['phone'])) ? strip_tags($new_instance['phone']) : 'unchecked';
    return $instance;
  }
Adding widget() – Front-End design
It defines the look of your WordPress custom widget on the front-end.
  // Creating widget front-end

  public function widget($args, $instance)
  {
    $title = apply_filters('widget_title', $instance['title']);
    $fullName = $instance['fullName'];
    $email = $instance['email'];
    $phone = $instance['phone'];
    // before and after widget arguments are defined by themes
    echo $args['before_widget'];
    if (!empty($title)) echo '<h5>' . $args['before_title'] . $title . $args['after_title'] . '</h5>'; ?>

    <!--This is where you run the code and display the output-->

    <?php if ($fullName === 'check' || $email === 'check' || $phone === 'check') { ?>
      <form action="" method="post">

        <?php if ($fullName === 'check') { ?>
          <label for="fullname"><?php _e('Full Name'); ?></label>
          <input type="text" class="widefat" id="fullname" name="fullname" required />
          <br>
        <?php } ?>

        <?php if ($email === 'check') { ?>
          <label for="email"><?php _e('Email'); ?></label>
          <input type="email" class="widefat" id="email" name="email" required />
          <br>
        <?php } ?>

        <?php if ($phone === 'check') { ?>
          <label for="phone"><?php _e('Phone'); ?></label>
          <input type="number" class="widefat" id="phone" name="phone" required />

        <?php } ?>
        <br><br>
        <input type="submit" name="submit" />
      </form>
    <?php
    } else {
      echo "<h5>No Form Field Choose</h5>";
    }


    if (isset($_REQUEST['submit'])) {
      $fullname = $_REQUEST['fullname'];

      $email = $_REQUEST['email'];

      $phone = $_REQUEST['phone'];

      $message = "Widget send mail successfully receive";

      //php mailer variables
      $to = $email;
      $subject = "Widget Form Message";
      $headers = 'From: ' . $email . "\r\n" .
        'Reply-To: ' . $email . "\r\n";

      //Here put your Validation and send mail
      $sent = wp_mail($to, $subject, strip_tags($message), $headers);

      if ($sent) {
        echo "<br><h5>Mail set successfully</h5>";
      } else {
        echo "<br><h5>Mail set have error</h5>";
      }
    }

    echo $args['after_widget'];
  }
When you click on “Submit” button it will send Email
if you have issue in send mail click here to fix
Full Widget Code
Here is full code you can copy and paste in function.php file of active theme
// Creating the widget
class webdav_widget extends WP_Widget
{

  function __construct()
  {
    parent::__construct(

      // Base ID of  widget
      'webdav_widget',

      // Widget name will appear in UI
      __('WebDav Widget', 'webdav_widget_domain'),

      // Widget description
      array('description' => __('Sample widget to create form', 'webdav_widget_domain'),)
    );
  }

  // Creating widget front-end

  public function widget($args, $instance)
  {
    $title = apply_filters('widget_title', $instance['title']);
    $fullName = $instance['fullName'];
    $email = $instance['email'];
    $phone = $instance['phone'];
    // before and after widget arguments are defined by themes
    echo $args['before_widget'];
    if (!empty($title)) echo '<h5>' . $args['before_title'] . $title . $args['after_title'] . '</h5>'; ?>

    <!--This is where you run the code and display the output-->

    <?php if ($fullName === 'check' || $email === 'check' || $phone === 'check') { ?>
      <form action="" method="post">

        <?php if ($fullName === 'check') { ?>
          <label for="fullname"><?php _e('Full Name'); ?></label>
          <input type="text" class="widefat" id="fullname" name="fullname" required />
          <br>
        <?php } ?>

        <?php if ($email === 'check') { ?>
          <label for="email"><?php _e('Email'); ?></label>
          <input type="email" class="widefat" id="email" name="email" required />
          <br>
        <?php } ?>

        <?php if ($phone === 'check') { ?>
          <label for="phone"><?php _e('Phone'); ?></label>
          <input type="number" class="widefat" id="phone" name="phone" required />

        <?php } ?>
        <br><br>
        <input type="submit" name="submit" />
      </form>
    <?php
    } else {
      echo "<h5>No Form Field Choose</h5>";
    }


    if (isset($_REQUEST['submit'])) {
      $fullname = $_REQUEST['fullname'];

      $email = $_REQUEST['email'];

      $phone = $_REQUEST['phone'];

      $message = "Widget send mail successfully Receive";

      //php mailer variables
      $to = $email;
      $subject = "Widget Form Message";
      $headers = 'From: ' . $email . "\r\n" .
        'Reply-To: ' . $email . "\r\n";

      //Here put your Validation and send mail
      $sent = wp_mail($to, $subject, strip_tags($message), $headers);

      if ($sent) {
        echo "<br><h5>Mail set successfully</h5>";
      } else {
        echo "<br><h5>Mail set have error</h5>";
      }
    }

    echo $args['after_widget'];
  }


  // Widget Backend
  public function form($instance)
  {
    if (isset($instance['title'])) {
      $title = $instance['title'];
    } else {
      $title = __('New title', 'webdav_widget_domain');
    }

    if (isset($instance['fullName'])) {
      $fullName = $instance['fullName'];
    }

    if (isset($instance['email'])) {
      $email = $instance['email'];
    }

    if (isset($instance['phone'])) {
      $phone = $instance['phone'];
    }


    // Widget admin form
    ?>
    <p>
      <label for="<?php echo $this->get_field_id('title'); ?>"><?php _e('Widget Title:'); ?></label>
      <input class="widefat" id="<?php echo $this->get_field_id('title'); ?>" name="<?php echo $this->get_field_name('title'); ?>" type="text" value="<?php echo esc_attr($title); ?>" />
      <label for="<?php echo $this->get_field_id('fullName'); ?>"><?php _e('Show Name Form Field:'); ?></label>
      <input type="checkbox" class="widefat" id="<?php echo $this->get_field_id('fullName'); ?>" name="<?php echo $this->get_field_name('fullName'); ?>" value="check" <?php echo ($fullName == 'check') ? "checked" : ""; ?> />
      <br>
      <label for="<?php echo $this->get_field_id('email'); ?>"><?php _e('Show Email Form Field:'); ?></label>
      <input type="checkbox" class="widefat" id="<?php echo $this->get_field_id('email'); ?>" name="<?php echo $this->get_field_name('email'); ?>" value="check" <?php echo ($email == 'check') ? "checked" : ""; ?> />
      <br>
      <label for="<?php echo $this->get_field_id('phone'); ?>"><?php _e('Show Phone Form Field:'); ?></label>
      <input type="checkbox" class="widefat" id="<?php echo $this->get_field_id('phone'); ?>" name="<?php echo $this->get_field_name('phone'); ?>" value="check" <?php echo ($phone == 'check') ? "checked" : ""; ?> />
    </p>


<?php
  }

  // Updating widget replacing old instances with new
  public function update($new_instance, $old_instance)
  {
    $instance = array();
    $instance['title'] = (!empty($new_instance['title'])) ? strip_tags($new_instance['title']) : '';
    $instance['fullName'] = (!empty($new_instance['fullName'])) ? strip_tags($new_instance['fullName']) : 'unchecked';
    $instance['email'] = (!empty($new_instance['email'])) ? strip_tags($new_instance['email']) : 'unchecked';
    $instance['phone'] = (!empty($new_instance['phone'])) ? strip_tags($new_instance['phone']) : 'unchecked';
    return $instance;
  }

  // Class webdav_widget ends here
}

// Register and load the widget
function webdav_load_widget()
{
  register_widget('webdav_widget');
}
add_action('widgets_init', 'webdav_load_widget');
Adding the Code to functions.php file
To insert the code to your functions.php file.
1. Log in to your WordPress admin area. Then, navigate to Appearance -> Theme Editor -> Theme Functions.
2. Paste the code from your text editor to the bottom of functions.php file. Click Update File to save the changes.